How to Draw Hair Step by Step Envato Tuts+
Table Of Content
Now that both hair layers have been converted to lineart, the rest is easy! You can fill in some of the larger gaps using a large brush, and start working on the shape of the hair on the other side. Personally, I like it better when the hair isn't exactly symmetrical. Also as mentioned before, you can treat hair like ribbons or chunks!
Top Articles in Category
Just the thought of this can be very discouraging. First of all, you don’t need to spend 90% of your time meticulously drawing your subject’s hair. In fact, this step can be done so quickly it might even become your favorite step.
Step Two: Create the shape of the hair
With the overwhelming amount of detail and commitment required, many people lose their patience and resort to a series of sloppy scribbles. • The little strands on Step 3 follow a very similar direction, but slightly more pronounced, enough to add dynamism to the shape of the hair clump. Let’s keep in mind that there is always space between strands and over layers of hair, which builds up to create volume. As my drawing advances, I ponder some possibilities for drawing the hair.
40 Best Halloween Makeup for 2023 - Easy Halloween Makeup Ideas - The Pioneer Woman
40 Best Halloween Makeup for 2023 - Easy Halloween Makeup Ideas.
Posted: Wed, 21 Jun 2023 07:00:00 GMT [source]
How to draw a nose from the front – 7 easy steps

An eraser pencil or eraser pen works best at lifting the graphite in these areas. Strands of lighter hair can be developed using the eraser as well. For each layer of graphite that we apply, we'll use a blending stump to work the medium into the tooth or texture of the paper. This will help to create the impression of softness and smooth any inconsistencies produced by the softer graphite applications. All hair colors will feature a full range of value.
Tip #3: Highlight the curved hair strands.
If you’ve never tried painting hair, give it a try. Here you’ll find even more easy-to-follow tutorials for drawing bangs. This tutorial shows you how to draw different types of bangs.
Fox Drawing – An Easy Drawing Tutorial for Beginners
We'll define the volume of these forms in the next step, but for now we'll concentrate on defining the shapes. He completed his fine art degree, majoring in History of Art and Contemporary Drawing Practice at the University of Witwatersrand, South Africa. Before joining acrylgiessen In 2020, Matthew worked part-time as an art teacher at Reddford Blue Hills High school. Matthew creates drawing and painting tutorials for acrylgiessen and captures them not only photographically and in written form.
As is the case with any subject that you draw, practice is important. The more that we practice with a particular subject, the better we understand it. Drawing a whole head of hair will give you lots of practice. However for some, the thought of doing this may be intimidating.
How to Draw Realistic Hair
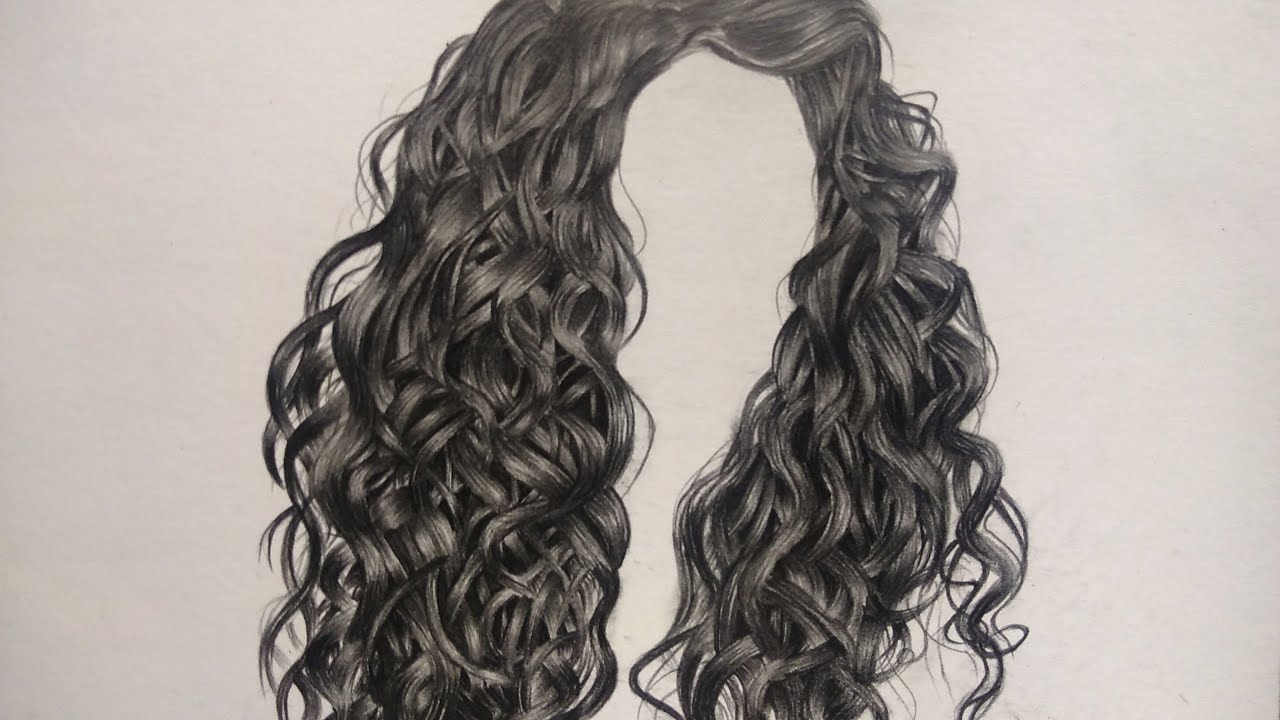
It is very light, so when the character moves, the wind, the humidity, or anything that surrounds it can affect its silhouette. Add in the smallest sets of hair splits, folds and clumps to finish the line drawing. You should eventually have a line drawing with a good amount of details similar to the example above. Draw bigger curls within the outline, following the direction you've established before.
At this stage don’t worry about getting every small hair clump but instead focus on it’s overall volume and large shapes that define the hairstyle. I may be defining this process as a four-step approach, however it's more like a three-step approach. The third and fourth steps are combined and are executed at the same time. Before we begin the process of drawing the hair, we need to be sure that the structure of the head is drawn in place. The structure of the head dictates the shape and flow of the hair and should be defined before we begin drawing the hair.
Using the mapping pen with default settings as shown above, I start following the lines of the bangs with short, curved strokes. I'm using a thinner brush at first, but I'll be adjusting brush size intermittently. Changing up the brush size is what will give the hair depth. Now that you have a rough sketch of the hair, you can finalize it by lining on top on a new layer. I usually follow the sketch while making it neater, which means redrawing the lines over and over again until I'm satisfied. This method can be quite time-consuming and tedious.
But a change in your approach can help you leave those fears behind. In this tutorial, I will introduce 4 simple steps for drawing realistic looking hair. Similar to the first hairstyle begin by applying an initial series of strokes that will define the light, medium and dark areas of the hair.


Comments
Post a Comment